Monthly Archives: February 2018

Underwater Photography

Underwater photography is beautiful and always unique, whether its taken with models in a pool or naturally in the ocean. When taking photos underwater, the settings of your camera are very important.

3_tiger_grouper_sterling

Photograph by Sterling Zumbrunn

When taking closer photos, it is important to have the flash on in order to get as many of the vibrant colors as possible. The camera should also be in macro mode with the auto white balance on.

ti_725_52591909286541

Photograph by http://www.polkacafe.com/underwater-photographers-in-india-2484.html

When taking photographs from a couple feet away, it is suggested that you have the manual white balance set and the camera flash turned off. Shooting from farther away causes your photos to look more blue and it is more likely that you will capture particles in the water (unless the water being shot in is extremely clear).

Daniel-Woods-las-vegas-photographer-print--4

Photograph by Daniel Woods

The main thing to remember with underwater photography is that the closer you are to the subject, the more colors you will get and the better your photo will look.

Written by Shelby Hart

Leave a comment

Filed under Uncategorized

Complimentary Colors

The color wheel or color circle is based on red, yellow and blue, and is traditional in the field of art. Sir Isaac Newton developed the first circular diagram of colors in 1666.


Primary Colors: Red, yellow and blue
In traditional color theory (used in paint and pigments), primary colors are the 3 pigment colors that cannot be mixed or formed by any combination of other colors. All other colors are derived from these 3 hues.

Secondary Colors: Green, orange and purple
These are the colors formed by mixing the primary colors.

In visual experiences, color harmony is something that is pleasing to the eye. It engages the viewer and it creates an inner sense of order, a balance in the visual experience. When something is not harmonious, it’s either boring or chaotic. In order to avoid this dilemma, one of the best ways to photograph is with complimentary colors. Complementary colors are those which are opposing on the color wheel.

Each primary color has its own respective complementary color. These opposing colors create maximum contrast and maximum stability. Using contrasting colors in a composition nearly always results in a strong image. The key is to keep the composition simple, and not to overwhelm it with too many hues.

Keep it Simple!

For more about color harmonies and complementary colors check out http://www.tigercolor.com/color-lab/color-theory/color-harmonies.htm .

– Cass Clark

Leave a comment

Filed under Uncategorized

5 most expensive photographs in the world

The most expensive photos always cause curiosity and surprise. Some of them need to look at the galleries, the popularity of others completely unexplained. What forces buyers to pay such money for photos?


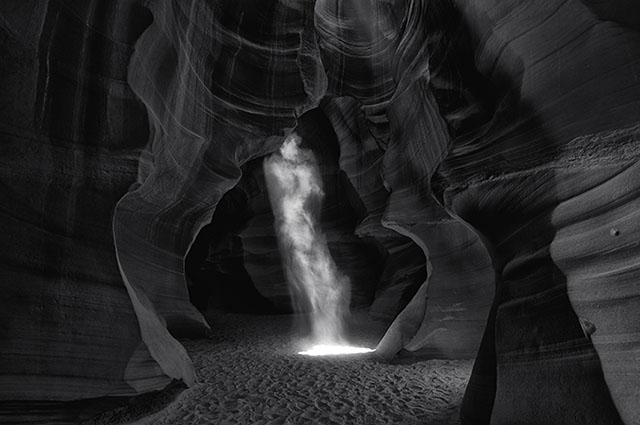
1.  “Phantom” (2014) $6.5 million

Australian landscape photographer Peter Lik has taken the crown for the most expensive photo ever sold.  His black and white photograph called “Phantom” was bought by a private collector for $6.5 million. “Phantom” was captured at Arizona’s Antelope Canyon, a slot canyon that’s popular among landscape photographers, and shows a beam of light resembling a “ghostlike figure.”

peterlikphantom

Photo by news.artnet.com


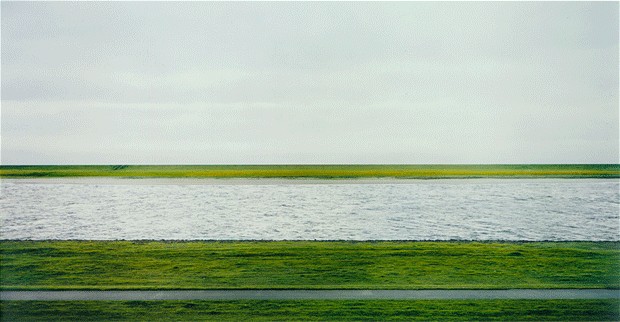
2. “Rhine II” (1999) $ 4.3 million

German photographer Andreas Gursky is famous for his large-format images of architecture and landscapes. In 1999, he took a series of six photographs of the Rhine, the largest and most famous of which was the Rhine II. To achieve the impression of a deserted landscape, he had to remove some elements from the photograph on his computer: the building of the plant, pedestrians, cyclists.

Rhein_II_2052673b

Photo by www.telegraph.co.uk


3. “№ 96” (1981) $ 3.9 million

The works of Cindy Sherman, famous for his provocative self-portraits, are very popular among collectors.  She does not name her photographs in order to give the audience the opportunity to think of the story itself. “№96 ” – one of the 12 photos of Centerfold series, commissioned by ArtForum magazine.

This self -portrait of Cyndy Sherman that is worth $3.9 million. The heroine in the photograph is a teenage girl. She holds cut out of newspaper advertisings about dating, symbolizing readiness to leave childhood behind and the desire to find her man.

At the time,” № 96″, sold at the auction” Christie ” for 3.9 million dollars, it was the most expensive photo in the world.

900x484x2

Photo by www.lomography.com


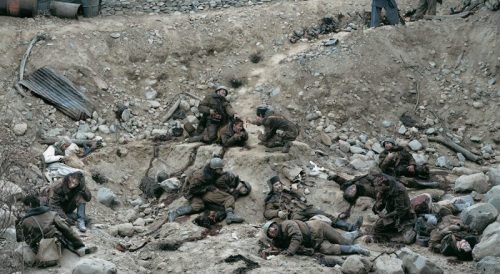
4. “Dead Troops Talk” (1992) $ 3.6 million. 

The title explains the story depicted in the photo — “the Vision after the ambush, which hit a patrol of the Soviet army near Mokor, Afghanistan, winter 1986.”  However, this is not a real shot: Canadian photographer Jeff Wall was not in Afghanistan. In “Dead Troops Talk”, Wall captures an intricate fictional scene that resembles at once a painting of war.

In 2012, again at the auction “Christie”, the photo was sold for 3.6 million dollars.

DQmT4ojkAvf6LAJYFvj6RpK3nTxcuwkgA9ySoMDg185J4bn

Photo by http://www.greynotgrey.com


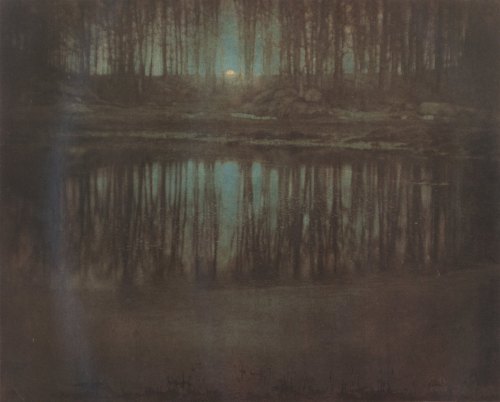
5.  “The Pond-Moonlight” (1904) $ 2.9 million.

The picture was taken in 1904 by the American photographer Edward Steichen, depicts a lake and a forest through the trees of which the moonlight breaks. At the beginning of the XX century, color photographs were an exceptional rarity, and “the lake in the moonlight ” the author painted by hand with the help of an autochrome method (potato starch granules filled with paints of different colors were applied to the film). These days, there are only three versions of the photograph. All of them have their own range of shades, as each frame was painted separately.

In 2006, one of them was sold at the Sotheby’s auction for $ 2.9 million.

ThePondMoonlight

Photo by http://photovide.com


Written by Olesya Kochegura


Leave a comment

Filed under Uncategorized

Few tips to pose a model

Photographers always face challenges day in and day out, but one of the toughest facets of their job is posing a subject.  Regardless of experience, when a model steps in front of the camera for the first time he/she will expect some direction. As a photographer, you want to engage with your model and give he/she directions in order to avoid bad result.


posing-pitfalls-topics

Photo by learn.lindsayadlerphotography.com


Do not try to put the model in an awkward pose in which he/she will feel uncomfortable. Let your model stand in a position which is more convenient for him/ her and you will get natural photographs.


ed02972f343736294b633d29f726f847--model-poses-photography-modern-fashion-photography

Photo by www.pinterest.com


Hands and fingers should be paid special attention, as their position should be as natural as possible. Of the basic rules worth remembering that it is not necessary to direct the hand in the camera lens. It’s better to tell your model to fix the hand in one position and then just slightly change it.

CocoRochapoziruetdliaHarpersBazaar-e1447584252358

Photo by showtopmodel


As a photographer, you can direct your model and give her an advice during the photo shoot. An open mouth can set a completely different mood and photograph. With the mouth closed, the jawline clenches and adds extra weight to the sides of their face. With the mouth slightly open, the jawline is elongated and gives a subtle intimate invite to the viewer.

Posing-To-Perfection-10-Crucial-Steps-To-Posing-A-Model-Fashion-710x532

Photo by fstoppers.com


Written By Olesya Kochegura

Leave a comment

Filed under Uncategorized

Still Life Photography

When photographing a still life subject, you are creating an image rather than capturing a moment. You are constructing your photograph  from background, to subject, to lighting. With the subject matter being inanimate objects, their tendency to stay very still allows you to take time to refine your lighting, and experiment with your composition.

You can use the daylight to get a particular type of brightness. Your ceiling light offers a very different type of light, often with a different hue. It all depends what effect you intend to have with your photograph. You can use backdrops to limit out some of the lighting. Still life is all about staging, and light is a very important factor in staging.

You want whatever you’re photographing to be appealing. This means arranging your objects accordingly. The rule of thirds uses a linear guide to position your camera in the optimal way. You can also use a technique called frame within a frame. This is exactly what it sounds like. You create a frame around your image inside of the frame of the camera. It draws the viewer’s focus to the center of the photo.

The idea of still life photography is that there is an up close focus on a certain object. You don’t want any clutter or distractions in the background. These could ruin the intention of you photograph. An example would be if you have an apple sitting on a table, having a blurred out background is a good way of taking attention away from the room around the apple.

For more tips go to https://digital-photography-school.com/tips-for-getting-started-with-still-life-photography/

Blogpost by Cass Clark

Leave a comment

Filed under Uncategorized

Jordan Matter

Jordan Matter is one of my favorite photographers. I first saw his work on Facebook and it didn’t take long for me to start following him on Instagram and Snap chat. His work interested me because of how good the frozen action of the dancers were. Its fascinating to see such an extreme action standing still, and while that is what dance photographers are supposed to do, I like how he incorporates them into our day-to-day scenery.

Matter photographs dancers of all ages puts them in everyday places and situations. It makes the images more personal and relatable in an abstract way. He turns something usual into a work of art.

He has published six books: Dancer Among Us, Dancers After Dark, Uncovered, Tiny Dancers Among Us, Athletes Among Us, and Circus Among Us.

Matter takes many risks, and often times his sessions involve things he’s not supposed to do, taking photos in places he shouldn’t like corporate stores, photos of nude dancers in public places for Dancers After Dark, or photos in fountains they’re not supposed to be in. He always manages to talk his way out though.

Matter makes sure that the dancers feel comfortable in front of the camera by telling them to wear outfits that they feel like they look good in, getting plenty of sleep before the shoot, and to not get into a major argument the night before so that they’re not grouchy the next day.

He knows a lot about dance so he can give good directions to the dancers like “do a Pirouette”, or “Quick! Do a Firebird”, but he is always eager to work with what the dancer has to offer.

Recently Jordan Matter has been doing the 10 Minute Photo Challenge where he tries to get as many different photos of the dancer in ten minutes. This involves a good amount of running (depending the area they are taking the photos), sometimes a clean up crew, and quick thinking on what moves to do and how it relates to the surroundings/ how they can incorporate the surroundings.

Jordan Matter is enthusiastic about his job and is always coming up with new ideas. His work continues to grow in popularity and inspires dancers and photographers everywhere.


Author: Olivia Tennefoss

Leave a comment

Filed under Uncategorized

Time-Lapse Photography

sun time lapse

From Carters News Agency

Ever since Tuesday in class, i wonder about objects being frozen as if time had stop. The term for this style photography is Time-Lapse,  a method that is used to film an object slowly before playing it in fast speed. Just like on Tuesday, for an example of “The Matrix”, a way to take a picture in a similar fashion is to have the cameras snapping a picture each second and angles.  I chose this picture because of how the clouds and the water looks. Since both have the viewer’s eyes travel to the middle of the photo. I also like the colors the camera captured in there since it made the clouds more colorful than dull grey or white.

FMGNMDLHMMF56R8.MEDIUM.jpg

From Do It Yourself

The picture above  is very similar to what i learn in class on Tuesday. Where the photographer focus on a light source, use a timer, and assuming spin the camera for the time to make the stars look like a vertex. Which is why i choose this photo as the star vertex looks great since it makes the eyes travel around or get dizzy. Additionally, the trees looks like they were about to be suck in the star vortex and to never be seen again.

moontimeslice-620x465

From Dan Marker-Moore

The picture above is an example what a time lapse picture looks like from the morning to night. In order to do this, presuming, is that photographer have to wake up super early/go in the noon and take pictures until midnight. This photo is great for understanding what Time-lapse photography is and how it requires patience to do this. The coolest part in this photo is how the moon comes up and changes color as it is rising. Also, how the moon shine even brighter when it reaches far in the night sky. Not to mention how the photo shows hues at the sky from light white blue to pitch black.

To see a video of Time-Lapse Photography go here – Garden pond

To see the step-to-step instruction go here – diyourself

–Karissa Scott–

Leave a comment

Filed under Uncategorized

Frozen Water Photography

frost-photo-ideas

Photo from Paxson Woelber

Despite winter being the season for coldness, there are great opportunities to take great photos, especially with ice, snow, or frost. The three winter water can create a nice blue effect with some whites, as seen above, and created emotion as well. Since seeing ice, like shown above, it can make you think cold, prickly, and hard to touch. The reason I select this was because I always have a fascinating with winter scenes and wanted to know how to do it. Because taking a picture of a winter scene mostly take place outside and i cannot stand the cold, so, assuming, you need patience in order to take a picture, like this one below.frozen-nature


Photo by Kasia

By looking at the photo, someone can tell that the photographer took this outside. Since the leave is laying on a sidewalk and it looks pretty chilly. Even by looking at the photo can give the viewer goosebumps. The reason I chose this photo was because of the leave. I like how the leave is in rule of thirds and the crack near it can lead to the upper corner where some frost are. Also, the leave is covered in ice and frost to represented how plants crunched up during the winter before dying. Seeing the nature wrinkled is the saddest part of winter, but it is the circle of life.

frozen-waterfall

Photo: Justin Fincher

The photo above looks so cool with the waterfall frozen and the icicles next to it. For this picture, the photographer must walk into the woods/forest and came upon this amazing site. This photo is great to capture what deep cold looks like from the very top of the waterfall to what is considered to become warm at the bottom, but still frozen. From the waterfall, the viewer’s eyes can travel down and go to the right wherever the water will ended up. That is one reason why i pick this photo. The other is because, same as the leave, it gives the extract of what happens to nature during winter or when it gets cold outside.

More info of frozen water photos, please go to this website – https://www.picturecorrect.com/tips/frost-ice-photography-tips/ or watch this two video- https://www.youtube.com/watch?v=HaDHJtbybSI (the short one) or the one with Joshua Holko.
— Karissa Scott —

Leave a comment

Filed under Uncategorized

Macrophotography

snail

Photo from: Shaw Academy

Macro photography is the art of bringing small subjects to larger size while showing tremendous amounts of detail. A 50-60mm lens is suitable for general macro work but a longer lens range may be needed when trying to capture more skittish subjects like butterflies.fly

Photo by: Regayip Kocak

Extension tubes can be mounted between your lens and the camera body to help you focus more closely to your subject and create a much larger image. These tubes are a much cheaper alternative than macro lenses, but require more time to set up.

flowers

Photo by: Micael Widell

Select a high aperture setting (between f/16 – f/22) to get the most out of your available depth of field and make your images look all around sharper. Alternatively, a lower aperture setting (between f/2.8 – f/4) to show less sharpness but make your subject pop against an out of focus background. The image above on the left was taken at f/2.8 and the one on the right was taken at f/22.

By John Kyritsis

1 Comment

Filed under Uncategorized

Kinetic Photography

Kinetic photography is an alternative form of light painting. Instead of drawing with the light itself, it relies mostly on the motion of the camera and a long exposure to produce the image. Usually this results in throwing the camera up into the air to get the desired effect.

While many people would cringe by having to throw their camera in the air, the outcome can be quite cool.

To achieve this photo you first want to make sure you have your camera strap securely around your wrist. Make sure your shutter speed is adjusted to the length of the toss. Make sure you have it in a dark space to allow for the lights to show up. Don’t be afraid to experiment with your light source and how you toss your camera to get different effects.

By: Jana Ruark

Source: Kinetic Photography: Techniques and Stunning Examples

Leave a comment

Filed under Uncategorized